In the current meta, we see that Yeti Smash has a solid portion of successful 3-Star attacks at Town Hall 12 and also Town hall 13 so I wanted to write you a guide to help you use this strategy properly in your war attacks. If you look for meta strategies, check out the latest version of the attacking tier list where you find all the attacking strategies that work well in Clash of Clans right now.
How Yeti Smash Works
You will basically build a wide funnel to lead all your troops into the center of the base, take out everything there and then clean up. Yeah, sounds too easy, right?
Alright, let’s get a little deeper. PEKKA Smash was pretty successful for the reason that the PEKKA are pretty strong in surviving and also dealing substantial damage at the same time, but they are slow and as time is also an important factor when attacking in Clan War, Yeti’s became a solid alternative because they deal good damage and also have the Yetimites that jump into buildings to deal damage – this gives this attack strategy a lot higher viability compared to PEKKA’s
And this strategy is fairly easy to use, as long as you can set up your funnel right and get some good value out of your Sige Machine and your Warden Walk and King, you will be able to consistently 3-Star TH12 and TH13 bases right now.
Which Town Halls Levels does Yeti Smash work?
Town Hall 12 & 13
Main Purpose Of This Attacking Strategy
Clan War, Clan War Leagues
Pros of PEKKA Smash:
+ Pretty easy to use
+ High success rate
Cons of PEKKA Smash:
– You need well upgraded Yeti, PEKKA and also Warden for this
Troop Composition To Use
- 5 Healer
- 1-3 PEKKA / Bowler (depends on how much Bowler Value you can get, more on that below)
- 4-7 Yetis
- Some Balloons/Wizards/Baby Dragon (depends on cleaning)
- 1 Jump Spell
- 4 Earthquake Spells
- 1 Poison Spell
- 2 Rage Spells
- Wall Wrecker/Stone Slammer as Battle Machine
Your composition is always depending on the base you’re hitting, so let me give you some insights first.
 Bowlers & PEKKAs are depending a lot how much value you can get out of your Bowlers in a base. If you do see a base where many structures in the center are close together, you want to take more Bowlers because you get great value here. If not, rather settle with PEKKAs or go more heavy on PEKKAs. You can see in the image here a base where Bowler get good value because they will hit buildings with the bounces very well.
 Earthquake Spell & Jump Spell. It’s nice to have both options and especially if you have a space in a base where the Earthquake Spells can damage defenses like the Eagle Artillery, Scattershot or even the Town Hall at the spot where you want to break the wall, you get great value out of that. Otherwise, the Jump Spell is a cheaper alternative when you can use it (radius and location).
 Wall Wrecker/Stone Slammer is also depending on the base. If you do see the option to actually get a ton of value from using a Stone Slammer to take out a very dangerous defense, like a Multi-Target Inferno Tower or a Scattershot, use it. However, this doesn’t happen that often so most of the time the Wall Wrecker be your friend.
Yeti Smash Step by Step
Breaking this attack down, there’s only a few steps you need to do:
- Build your funnel into the base with King/PEKKA and Warden Walk
- Send in your Yeti’s, Bowler, PEKKAs to clear the center of the base
- Clean up the rest of the base
I know this sounds extremely easy but it’s actually not much more complicated, but there are some pitfalls to avoid when doing this, especially when creating your funnel and when using spells right to support your troops efficently.
Building Your Funnel
Normally you do that by clearing the edges so you have a clear path towards the center of the base to take out the Eagle Artillery and the Scattershots as quickly as possible.
The classical setup would be using your Barbarian King in one edge and support it with 1-2 Balloons or a few Wizards to get him nice value. You want to use this one on the edge where you don’t have a defense like a Single-Target Inferno Tower.
The other edge is for the Grand Warden Walk and here you want to get bug value so hopefully get something like a Scattershot or a Multi-Target Inferno Tower.
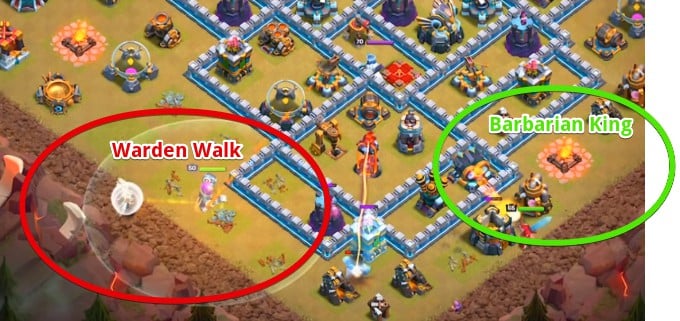
A Warden Walk is superior than a Queen Walk because the Warden has a longer range and can reach buildings deeper inside the base compared to the Queen and you can control him more easily.
Pro Tip! If the Warden will walk somewhere else, you can simply place some troops inside his aura and this will put him in support mode and let him stick where he is 🙂
After that, you normally have the base done like that and it’s time to crush it.
Send In Your Troops
Now you will go in with your Archer Queen, Yeti’s, PEKKAs and Bowlers. Use a Jump Spell before deploying them helps often times to make them go straight where they should go.
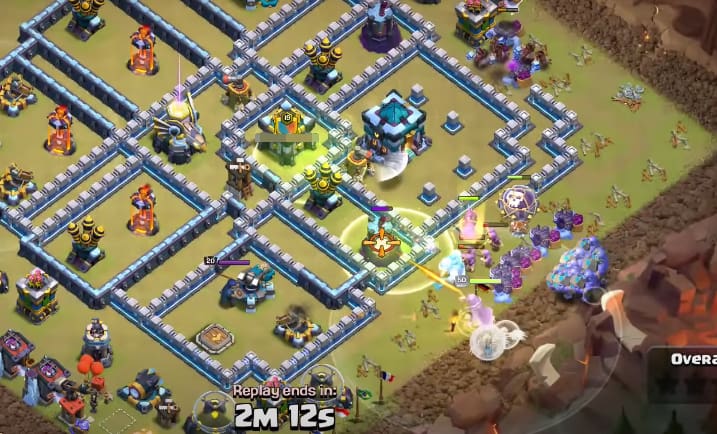
At this point the Warden will start following them and the Healers will do the same so you will get full forces here and don’t have to mind about the Warden and can use his ability when you need to (normally that’s when you did destroy the Town Hall to prevent big damage on your army).
Inside the base you want to use your Earthquake Spells to get the walls and the buildings around it destroyed so your troops have it easier to take them down fast. If you don’t have Earthquake Spells because the base setup is not that great for Earthquake and using Jump Spells makes more sense make sure to drop them in time to get to the Eagle Artillery and the Scattershots as fast as possible.
That’s now also the time to use your Rage Spells to get the biggest bang possible.
At this point spell timing is the only crucial thing to do because you have your troops down and there’s not much more you can do.
Cleaning Up
Now use your Royal Champion and your cleanup troops to take care of the leftover defenses and buildings on the outside.

Do not wait too long with starting this clean up or you risk running out of time. The Warden Walk costs precious time in the beginning so don’t wait too long before you start sending them in, every second can count.
I know many people rather wait in case their troops won’t make it through the base to get the maximum value but in my opinion it’s better to rather risk getting a few percentage points less when your main army failed in the core but make sure to actually get the 3-Star without running out of time when they do get the center done. You want the 3-Star so do what’s needed and don’t play this step slow 🙂


